
Week 1: Demolition!
We’ve completed our first week of demolition at our Colonial fixer upper! And boy it was the longest, most exhausting and absolutely filthy week. Ever. This picture above was taken at the beginning of our demolition week when we had enough energy to lift a sledgehammer (a housewarming gift from our dear friend Randy Guerber, thanks Randy!). Notice we were smiling! I don’t think we can manage to crack even a slight smile right now. That would take too many muscles.
As soon as we got the keys to the house we got started punching holes through walls and ripping up flooring to see what we are working with. We were overly excited to get started. And in that process we’ve discovered quite a few surprises which has forced us to change plans and alter course… a few times. If you haven’t taken the video tour of the house yet, check it out here!
We’re now only on day 7 and both of us are sore and dead tired! We’ve used muscles that we didn’t even know existed! Even though it is backbreaking work, it has been a productive week and we have made some pretty good progress. Here’s a rundown of what we’ve done so far!
The Kitchen and Dining Room
One of the main layout changes we wanted to make to this house was to completely remove the wall between the kitchen and dining room to have an open concept floor plan. But…. when we tore down the drywall, we discovered that this particular wall has plumbing from the upstairs bathrooms running right through the center of it. Surprise #1! We thought there might be a possibility that there was something inside the wall… but we didn’t expect this. So… we could either hire a plumber and find out how much it would cost to reroute the plumbing, or we can keep the wall in place.


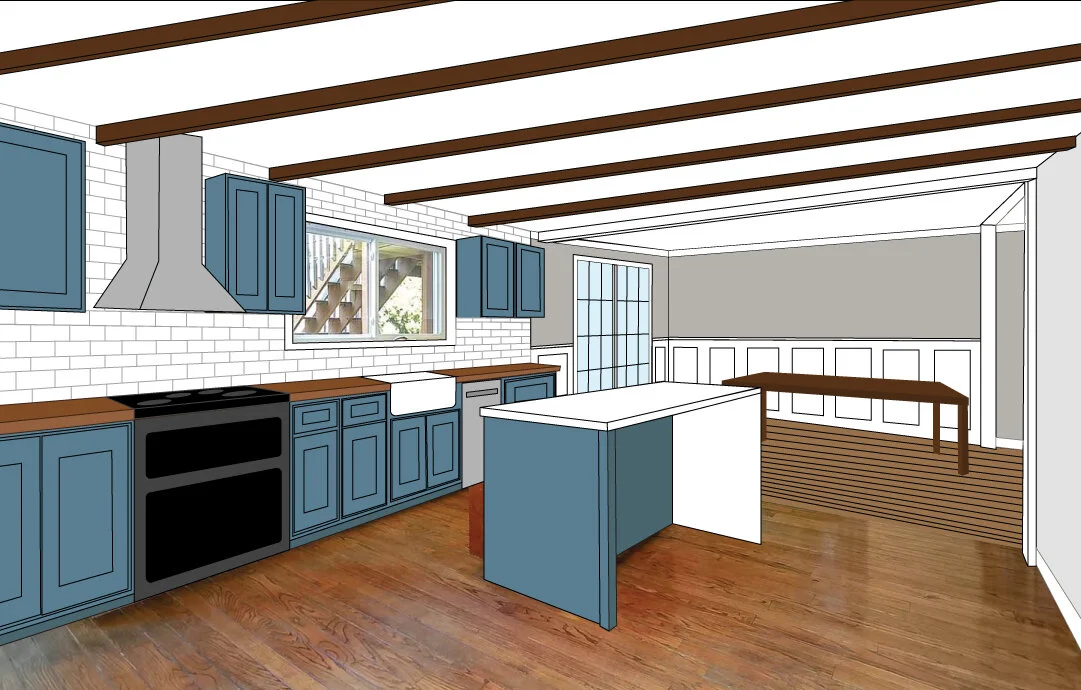
After discussing our options we determined that rerouting the plumbing would be too big of a blow to our out budget. So, it’s back to the drawing board with our kitchen design.
And that’s not all… remember that lovely drop ceiling in the kitchen with the florescent lights? Well, the soffit right at the top edge of this dining room wall has web of plumbing inside of it as well. A section of the drop ceiling will need to stay. So… we can’t remove the wall and we can’t remove the soffit. Bummer.

On the bright side, Michael was able to reconfigure our kitchen layout so that it is actually a much better kitchen than it was before! The new layout gives us a better location for the refrigerator and a bigger island, so all is not lost. There will still be a nice wide walk way between the kitchen and dining area so that it will feel like it is partially open concept. Actually, now that I’m thinking about it, when we’re having holiday meals in our new dining room - hiding a messy kitchen behind this partial wall might be the best plan! A little separation won’t be the worst thing.
The Living Room, Family Room and Entryway
I love a nice entryway. My hope for this house is to open up both walls in the hallway so that it feels bigger when you come inside. Originally, the left side wall was going to get a set of french glass pocket doors while the right side will be opened up to expose the staircase into the living room. But…. when Michael took the drywall down on the left side wall and I got the see the full effect of walking into an open concept family room…. I’m not gonna lie, I really liked it! I didn’t think I wanted that so I surprised myself!


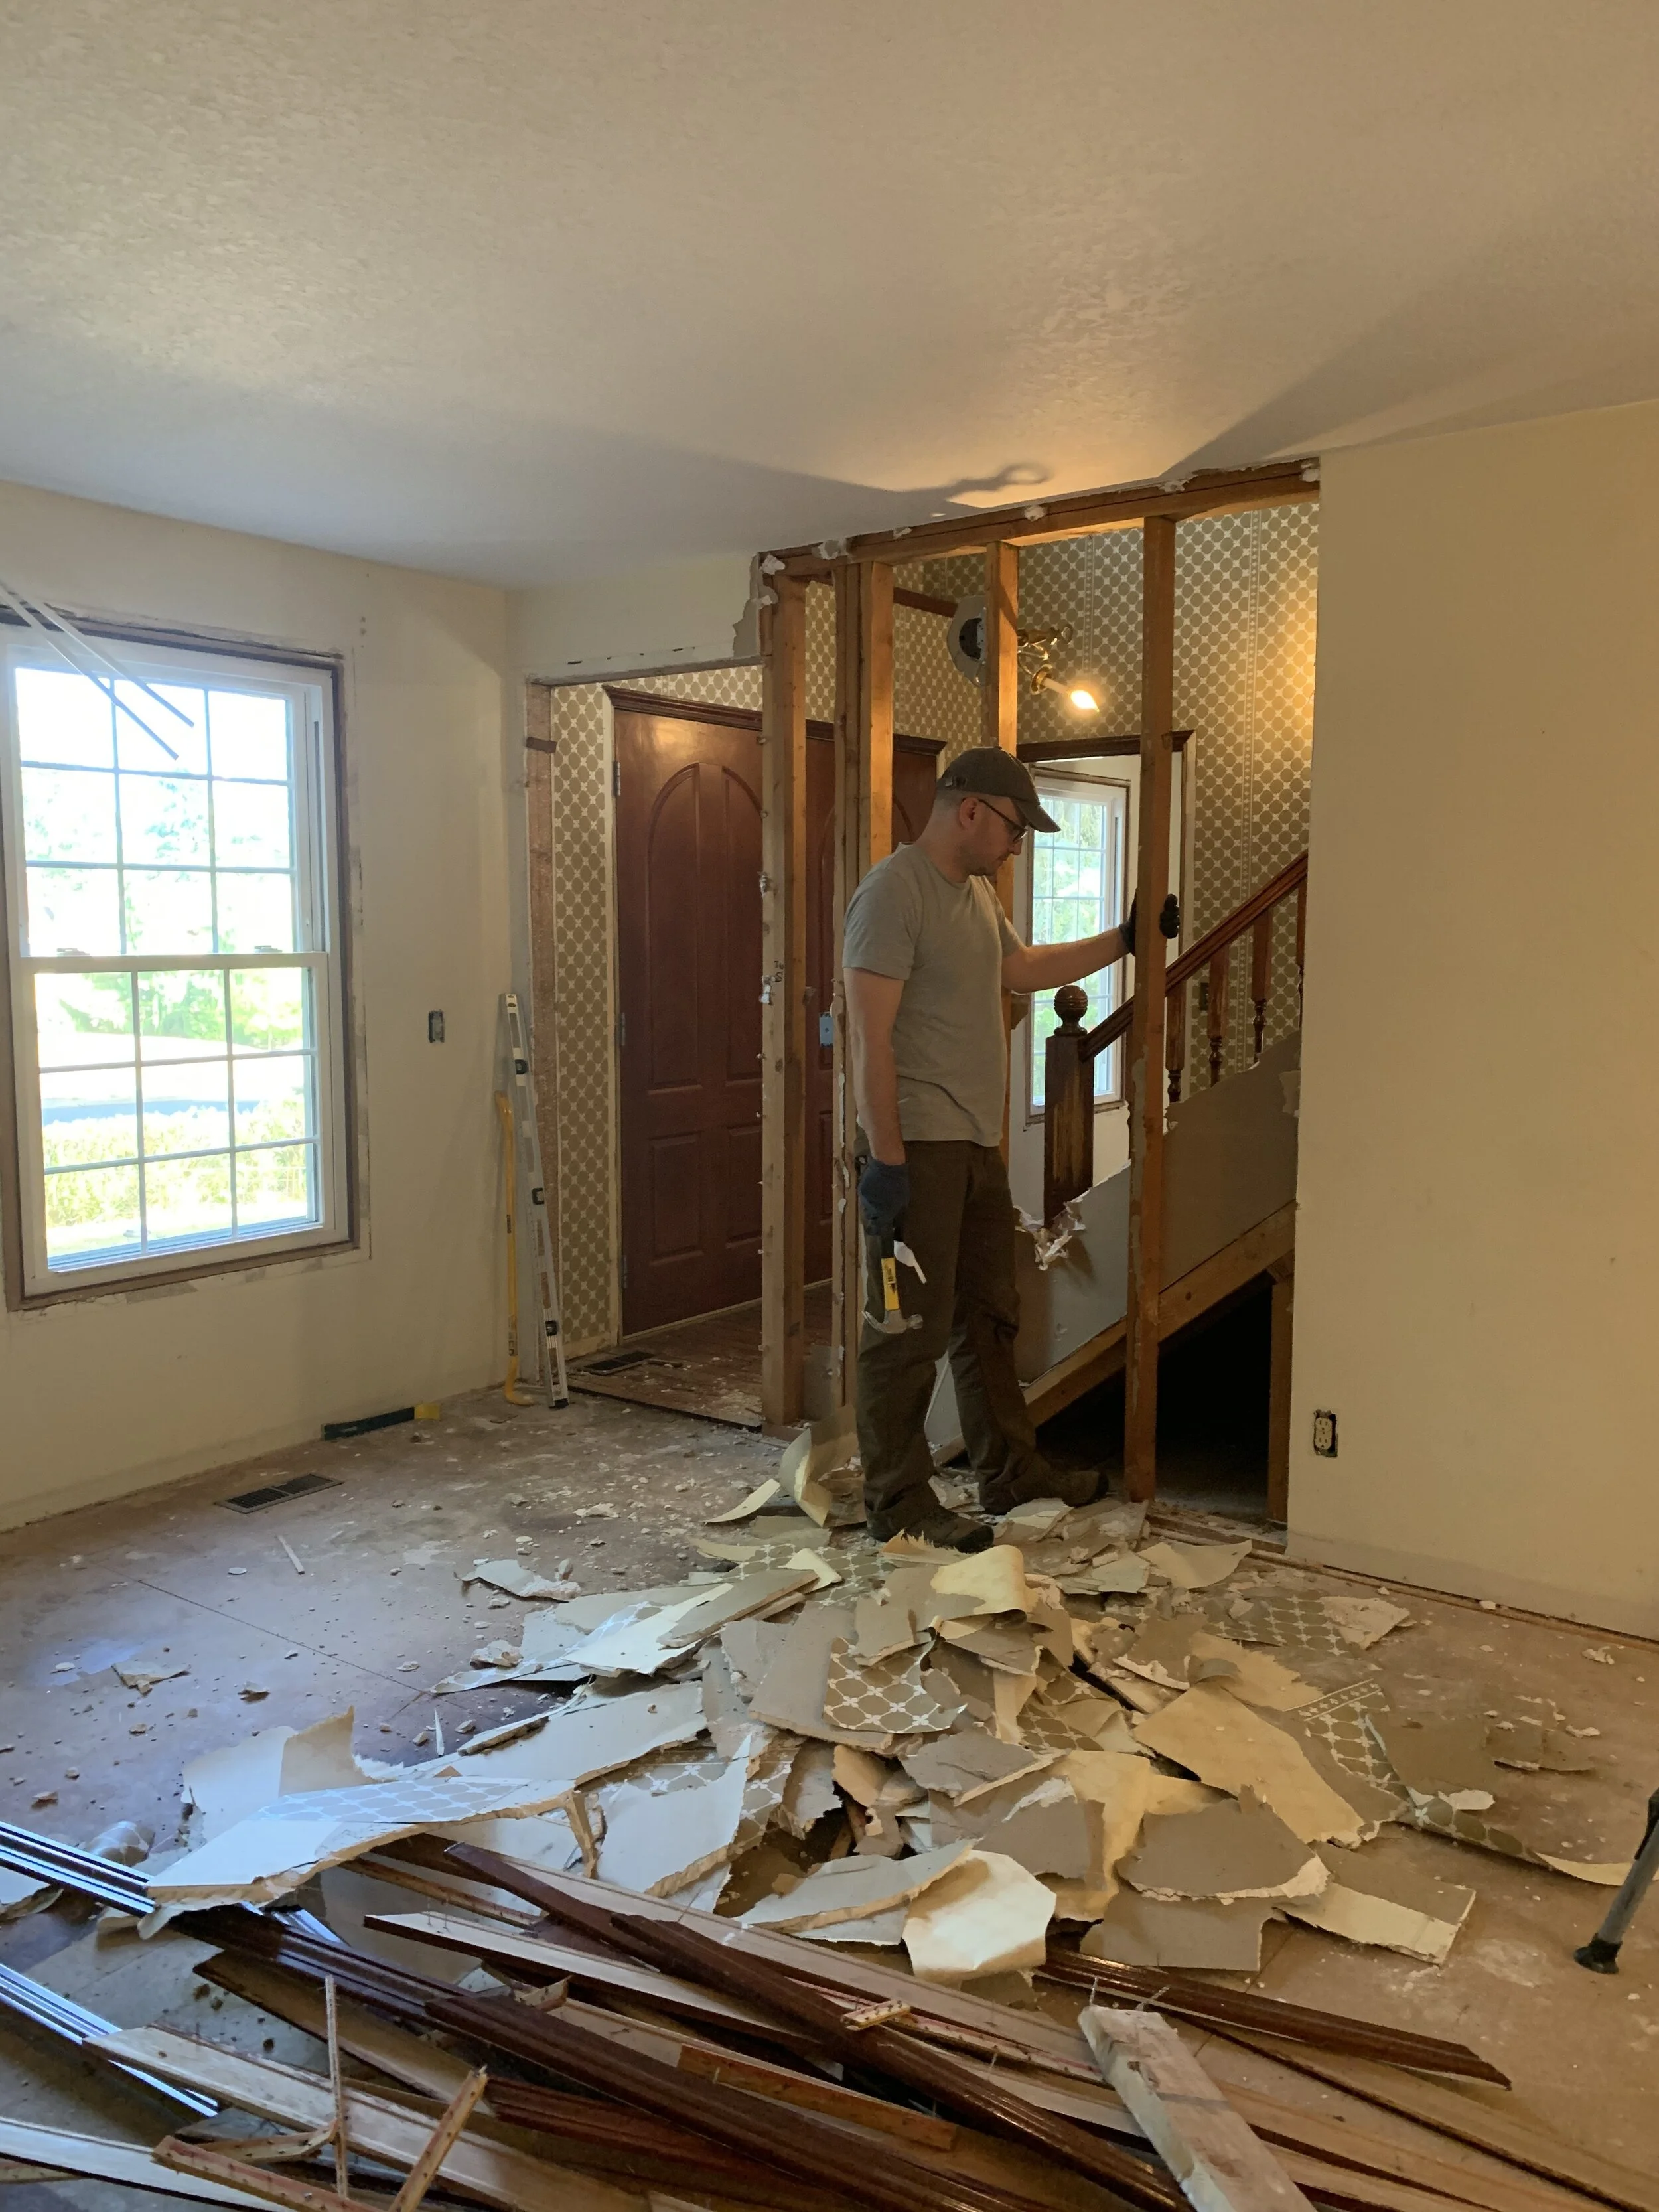


We were questioning whether or not this wall was a load bearing wall. We weren’t 100% sure that when we removed the 2x4s, the wall wouldn’t immediately collapse. But, we confirmed that the floor joist above the hallway wall was doubled up and the weight was supported by the 2 support posts in the kitchen, and the support posts in the exterior wall. Even though we were 99% sure the wall was not load bearing, there was that 1% piece of doubt that induced some anxiety and panic when we removed the wall completely. But, the 2x4s popped out with no problems, and the joists over head didn’t budge.
What has me excited about this new plan is that my line of sight now extends from the family room, into the kitchen, stairway, and living room. Imagine what this space will look like with Christmas decorations!.
So far this plan is coming along very nicely! Apart from the almost heart attack we had after removing the family room wall, I am very happy with how this is looking so far!

Truth time… drywall and carpet make suuuuuuch a mess! And, it’s a lot harder to pull out than it looks on the TV shows. Actually the whole demo experience on TV is a lie! They skip over ALL of the messy parts! Pet (and human) urine soaked carpets, dead mice, moldy subfloor, oh and the God awful smell… they don’t really show that stuff on TV. We’ve been through all of that this week (barf), and I’m sure we’ll see a lot more every day. Ripping out the carpet was disgusting. Ripping out the carpet padding was even worse. The amount of pet urine in the carpet is just hard to believe. I can’t imagine anyone ever actually living here in the condition this house was in. They must have been seriously nose blind. I think the demolition has really improved the look of the house. It is actually nicer in this dusty, disheveled state than it was before!
I’m really happy about the progress we’ve made so far in the living room and entryway. It’ll be super nice when it’s finished!
The Bedrooms
Oh…. the bedrooms. I feel like I should put a disclaimer here before I write anything.
THIS CONTENT MAY NOT BE SUITABLE FOR ANYONE WITH A WEAK STOMACH. SOME READERS MIGHT FIND THE FOLLOWING IMAGES AND DESCRIPTIONS DISTURBING. READER DISCRETION IS ADVISED.
First, I want to say that the people who lived here before did not treat their pets very well. In my mind I see it as animal abuse. The back side of every bedroom door is destroyed from hours and hours of dogs scratching to get out. The baseboards, door trim, staircase spindles/banister/rails, carpet, linoleum - all have been chewed and gouged because the pets were left alone in the house. The master bedroom carpet was eaten and torn through exposing the particleboard underneath. But, the worst of it was the pet urine. There are years worth of urine damage to the floors in these bedrooms. So much damage that the carpet padding was glued to the particleboard (not with glue…. but the padding absorbed so much urine that it fused to the flooring underneath). Pulling up that padding made us so sick. The particleboard under the carpet has started to swell in some places and disintegrate in others. When we pulled out parts of the particleboard the tar paper underneath was wet with pools of pet urine. The sub floor under the tar paper looks like it only has surface level stains, and from what we’ve seen so far hasn’t soaked through to the floor joists.
Every single bedroom.


The condition of the floors in these rooms is beyond anything I have ever seen or smelled. I started getting a headache from the urine smell within a few minutes of pulling up the carpet. Both of us needed to take several breaks and step outside for a bit of fresh air, let our stomach settle, and compose ourselves before getting back to work. Some people should not own pets if this is how they treated them. The carpet is now in a dumpster at the front of the house and it is baking in the sun. So, I want to issue a public apology to all of my new neighbors for our stinky driveway for the next few weeks.
Fun Times
We have had a pretty fun time this week while we completely destroyed this house. We’ll keep you updated on the new developments as we complete demo and start framing in new walls and rewiring.


